Thursday, April 25, 2013

The Precomp Node

WORKING WITH PRECOMP NODE
The Precomp node is similar to the Group node. However, its contents are stored in an separate NukeX script file. It helps in breaking a large script into smaller process trees. The Precomp node enhances the workflow and speeds up the rendering process as NukeX has to process a single image input instead of all nodes. This node enhances the collaborative workflow where one user can work on the main composition while others can work on sub-comps that can be modified independent of the main composition.

To add a Precomp node, select the nodes that you want to include in the separate script and then choose the Other button from the Nodes toolbar; the Other menu will be displayed. Next, choose Precomp from the menu; the Precomp Nodes dialog box will be displayed, as shown in Figure 1.

The Precomp Nodes dialog box
Figure 1  The Precomp Nodes dialog box 
Note:
If no node is selected when you create a Precomp node, the Precomp Nodes dialog box will not be displayed. However, you can add link to an existing script file to the empty Precomp node by using the file parameter from the Precomp# node properties panel.
In this dialog box, click on the folder icon corresponding to the Precomp script path parameter; the panelNode: Replace Precomp#_v01.nk dialog box will be displayed. Next, browse to the location where you want to save the precomp .nk script. Enter a name in the pathname name field for the precomp and then choose the Open button. Now, click on the folder icon corresponding to the Precomp render path parameter; the panelNode: Replace Precomp#.####.exr dialog box will be displayed. In this dialog box, browse to the location where you need to save the render of the precomp. Enter a name in the pathname field for the render file and then choose the Open button.
Note:By default, the precomp script is saved at the location where the main script exists. If you have not saved the main script, the precomp script is saved in the main directory.
Select the channels that you need to include in the precomp from the Channels drop-down of the Precomp Nodes dialog box. Select the desired option from the Original nodes drop-down. The options in this drop-down are used to determine the behavior of the selected nodes. Select the add backdrop option from this drop-down to add a backdrop behind the precomped nodes. Select delete option from the drop-down to delete the precomped nodes. Select no change option from the drop-down to retain its existing state.

Now, choose the delete option from the Original nodes drop-down and then choose the OK button from the Precomp Nodes dialog box; the Group Output dialog box will be displayed. In this dialog box, select the node that will work as output. Next, choose the OK button to close the dialog box. NukeX automatically creates a Write and an Output node in the precomp. On rendering, if NukeX can not find any Write or Output node in the precomp, it produces an error in the precomp.

Note:1. You should render the image in the .exr format as it is capable of storing hash value. NukeX uses hash value to match, the changes between the incoming node tree and the rendered file. If hash values do not match NukeX notifies you about the mismatch. If you are using any other format than .exr, you will not get this notification and there is a risk of using out of date render file. 
2. It is recommended that you set the project settings in the main comp. The precomp uses project settings of the main comp. If you open the precomp in a separate instance of NukeX and change its project settings, the change will have no effect on the main comp when it is loaded into the main comp.
Tip:To display hash value of a node, select the node in the Node Graph panel and press I; a window with information about node, including the hash value, will be displayed, refer to Figure 2.
A window displaying hash value of the Grade1 node
Figure 2  A window displaying hash value of the Grade1 node 
Rendering a Precomp Node
Create a Precomp node as discussed earlier. In the Precomp tab of the Precomp# node properties panel, choose the Render button; the Execute dialog box will be displayed, as shown in Figure 3. 

The Execute dialog box
Figure 3  The Execute dialog box
Specify the frame range that you need to render in the frame_range_string field located next to the Frame range drop-down and then choose the OK button to close the dialog box. On doing so, the Progress window will be displayed showing the rendering progress. It will automatically close once the rendering process completes. When the rendering process finishes, the read file for output check box in the Precomp tab of the Precomp node properties panel will be automatically selected. As a result, NukeX will read image sequence rather than calculating output of the precomp. You will also notice that the Precomp# node in the Node Graph panel has turned green. Also, the label (Read) will be displayed on it, refer to Figure 4. In case NukeX generates error on opening the rendered output, you can select the response from the missing frames drop-down. This drop-down has four options, namely error, black, checkerboard, and read input.

The green colored Precomp1 node with the Read label on it
Figure 4  The green colored Precomp1 node with the Read label on it
Viewing and Editing a Precomp Script
To view and edit a precomp script, choose the Open button in the Precomp node properties panel. On doing so, a new NukeX session will be launched and the precomp will be loaded in it. If you are using version numbers in the Write node, make sure to choose Edit > Node > Filename > Version Up from the menu bar; the version number of the file will be increased by one. For example, the myPrecomp_v01_###.exr will change to myPrecomp_v02_###.exr. Now render the Write node. Next, choose File > Save New Version from the menu bar or press ALT+SHIFT+S; the script will be saved with a new version. Fox example, the myPrecomp_v01.nk script will change to myPrecomp_v02.nk.

Reloading a Revised Precomp Script
To reload a revised precomp script, load the main comp. Next, in the Precomp tab of the Precomp# node properties panel make sure the name of the script in the file field matches with the current name of the precomp script. Next, choose the Reload button to reload the revised precomp into the main comp.

This article is taken from the Nuke Book: The Foundry Nuke 7 for Compositors.

Generate an alpha channel using the Shuffle node

Tutorial 2 of Chapter 10 (Transformations, Temporal Operations, and Filters) from The Foundry NukeX 7 for Compositors textbook:
In this tutorial, you will create an alpha channel from rose.jpg using the Shuffle node. Next, the alpha channel created using the Shuffle node will be used to mask the color adjustments made by using the HueShift node. Also, you will use the HueRotation parameter of the HueShift node to animate rose color. Figure 1 shows the input image and the output.
Nuke Book - Tutorial 2 Chapter 10
Figure 1  The input image and output
Step –1
Navigate http://www.mediafire.com/?51x6sa7cjscyb47 and then download nt003.zip to your hard drive. Next, extract the content of the zip file to your hard drive.

Step –2
Start a new script and then load the rose.jpg file; the Read1 node is inserted in the Node Graph panel. Next, press 1 to view the output of the Read1 node in the Viewer1 panel, as shown in Figure 2.
The output of the Read1 node
Figure 2  The output of the Read1 node
Step –3
Make sure the Read1 node is selected in the Node Graph panel and then press G; the Grade1 node is inserted between the Read1 and Viewer1 nodes.

Step –4
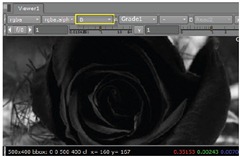
Hover the cursor over the Viewer1 panel and press B; the blue channel is displayed in the Viewer1 panel, as shown in Figure 3.
The blue channel displayed
Figure 3  The blue channel displayed

Next, you will modify the blue channel of the rose.jpg by using the parameters of the Grade1 node to create the alpha.


Step –5
In the properties panel of the Grade1 node, make sure the Grade tab is chosen and then set the values of the fields as follows:

blackpoint: 0.03 whitepoint: 0.0293 lift: -0.001
gain: 0.08 offset: -2 gamma: 1.3

Also, clear the red and green check boxes located on the right of the channels drop-down. After setting the values, the modified blue channel is displayed, as shown in Figure 4.
The modified blue channel
Figure 4  The modified blue channel
The Grade node is used to color-correct the overexposed images. The blackpoint parameter sets the black point (darkest pixel), whereas the whitepoint parameter sets the white point (lightest pixel) in the image. The color specified by the lift parameter defines the color into which the black pixels will change. The gain parameter is used to set the color of the white pixels. The multiply parameter is used to lighten the image while preserving the blackpoint. The values specified for this field are multiplied with the output of the Grade node. The offset parameter is used to add fixed offset value to the output of the Grade node. The gamma parameter is used to lighten or darken the midtones. It applies constant gamma to the result of the Grade node.

Next, you will blur the blue channel by using the Blur Node.

Step –6
Make sure the Grade1 node is selected in the Node Graph panel and then press B; the Blur1 node is inserted between the Grade1 and Viewer1 nodes in the Node Graph panel, as shown in Figure 5.
The Blur1 node inserted in the Node Graph panel
Figure 5  The Blur1 node inserted in the Node Graph panel
Step –7
In the properties panel of the Blur1 node, make sure the Blur tab is chosen and then select rgb from the channels drop-down. Next, clear the red and green check boxes which appear on selecting rgb from the channels drop-down, refer to Figure 6.
The Blur1 node properties panel
Figure 6  The Blur1 node properties panel
Step –8
Enter 10.5 in the size input box; the blue channel is blurred by 10.5 units. Figure 7 shows the blurred blue channel.
The blurred blue channel
Figure 7   The blurred blue channel
Step –9
Make sure the Blur1 node is selected in the Node Graph panel. Next, choose the Channel button on the Nodes toolbar; the Channel menu is displayed. Next, choose Shuffle from this menu; the Shuffle1 node is inserted between the Blur1 and Viewer1 nodes.

Step –10
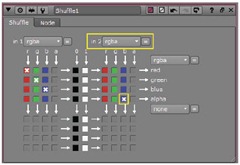
In the properties panel of the Shuffle1 node, make sure that the Shuffle tab is chosen. Next, select rgba from the in 2 drop-down and then select the blue check box in the 4th row of the in 2 channel matrix, refer to Figure 8; the alpha channel is shuffled with the blue channel.
The blue check box selected in the 4th row of the in 2 channel matrix
Figure 8  The blue check box selected in the 4th row of the in 2 channel matrix
Step –11
Hover the cursor over the Viewer1 panel and press A; the alpha channel is displayed. Again, press A; the RGB channels are displayed in the Viewer1 panel.

Next, you will add the HueShift node to change the hue of the rose and then mask the changes by using the alpha channel generated above.

Step –12
Select the Read1 node in the Node Graph panel. Next, press and hold SHIFT and then choose the Color button from the Nodes toolbar; the Color menu is displayed. Choose HueShift from the menu; the HueShift1 node is inserted in the Node Graph panel with a branched connection with the Read1 node, as shown in Figure 9. Next, release the SHIFT key.
The HueShift1 node in the Node Graph panel
Figure 9   The HueShift1 node in the Node Graph panel

Step –13
Make sure that the HueShift1 node is selected in the Node Graph panel and then press 1; the output of the HueShift1 node is displayed in the Viewer1 panel.

Step –14
Press and hold the left mouse button on the mask input of the HueShift1 node and then drag the cursor to the Shuffle1 node to establish a connection between the Shuffle1 node and the mask input of the HueShift1 node, refer to Figure 10.
The mask input dragged to the Shuffle1 node
Figure 10  The mask input dragged to the Shuffle1 node
Step –15
In the properties panel of the HueShift1 node, make sure that the HueShift tab is chosen and then set the hue rotation field value to -150. Figure 11 shows the output of the HueShift1 node.
The output of the HueShift1 node
Figure 11  The output of the HueShift1 node
The alpha channel which is generated using the Shuffle1 node is used to mask the output of the HueShift1 node. The HueShift node transforms the colorspace of the input image. The hue rotation field is used to rotate the colorspace around the Y axis. You can use different values for the hue rotation field to get the desired result.

Step –16
Select the Shuffle1 node in the Node Graph panel and choose the Color button from the Nodes toolbar; the Color menu is displayed. Next, choose Invert from the menu; the Invert1 node is inserted between the Shuffle1 and HueShift1 nodes in the Node Graph panel and the alpha channel is reversed. Figure 12 shows the output after inverting the mask.
The output after inverting the mask
Figure 12  The output after inverting the mask
Next, you will animate the HueRotation parameter of the HueShift1 node to create an animated color change effect.

Step –17
Make sure that the Current Time Marker is placed at frame 1. Next, in the properties panel of the HueShift1 node, make sure the HueShift1 tab is chosen and then choose the Animation button corresponding to the hue rotation parameter; a flyout is displayed, as shown in Figure 13. Next, choose the Set key option from this flyout; a keyframe is created at frame 1. Also, the base color of the HueRotation field turns blue which indicates that this parameter has been animated.
A flyout displayed on choosing the Animation menu button
Figure 13  A flyout displayed on choosing the Animation menu button
Step –18
Choose the Last frame button from the timeline controls and then enter 180 in the hue rotation field in the HueShift tab of the HueShift1 node properties panel; a keyframe is created at frame 100. Also, an animation node indicator (A) appears on the HueShift1 node tile in the Node Graph panel which indicates that one or more parameters of the node are animated, refer to Figure 14.
The animation node indicator displayed on the HueShift1 node
Figure 14  The animation node indicator displayed on the HueShift1 node
Step –19
Choose the Play forward button from the timeline controls to start the playback. You will notice in the Viewer1 panel, the color changes as the animation starts playing.

Next, you will render the script using the Write node.

Step –20
Make sure the HueShift1 node is selected in the Node Graph panel and then press W; the Write1 node is connected between the HueShift1 and Viewer1 nodes and its properties panel is displayed.

Step –21
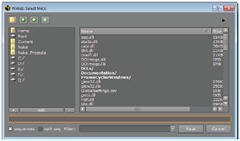
In the properties panel of the Write1 node, make sure that the Write tab is chosen and then click on the folder icon corresponding to the file parameter; the Write1: Select file(s) dialog box is displayed, as shown in Figure 15. In this dialog box, navigate to location where you need to save the file and then append c04_tut2.%03d_rndr.jpeg to the path displayed in the pathname field. Next, choose the Save button. Notice that the jpeg option is automatically selected in the file type drop-down of the Write1 node properties panel, refer to Figure 16.
The Write1:Select file(s) dialog box
Figure 16  The Write1:Select file(s) dialog box
The Write1 node properties panel
Figure 17  The Write1 node properties panel
The %03d in the file name c04_tut2.%03d_rndr.jpeg represents the frame padding structure in the file name. On rendering the script, NukeX will create a jpeg sequence starting from c04_tut2.001_rndr.jpeg to c04_tut2.100_rndr.jpeg as the global frame range is set from 1 to 100.

Tip:If you are rendering a single file such as a QuickTime (MOV) movie, no frame padding is required. You can just provide the name of the movie.

Step –22
Enter 1 in the quality field.

Next, you will set the frame range that you need to render.

Step –23
Choose the Render button; the Render dialog box will be displayed. In this dialog box, select global from the Frame range drop-down and then choose the OK button; the Progress window is displayed. This window will close automatically on completion of the rendering process.

If you need to render a single frame only, enter the frame number in the field next to the Frame range drop-down. On choosing the Play forward button from the timeline controls, the Write1 node will use the rendered jpeg sequence for displaying the output in the Viewer1 panel instead of its input.

Step –24
Choose File > Save from the menu bar to save the script. Figure 17 displays the network of nodes used in the script.
Network of nodes used in the script in the Node Graph panel
Figure 17  Network of nodes used in the script in the Node Graph panel

create motion blur effect using the motion vector pass

Tutorial 2 of Chapter 10 (Transformations, Temporal Operations, and Filters) from The Foundry NukeX 7 for Compositors textbook:

In this tutorial, you will create motion blur effect using the motion vector pass rendered from Maya and VectorBlur node. Figure 1 shows the input image and motion blur effect applied to an element in the scene.
Nuke Book - Tutorial 2 Chapter 10
Figure 1  The input image and motion blur effect displayed
Step –1
Navigate to http://www.mediafire.com/?k5288w91eeo16 and download file to your hard drive. Next, extract the contents of the file. The zip file contains footage used in this tutorial.

Step –2
Start a new script file in Nuke. In the Properties Settings panel set the HD format (1280x720 px).

Step –3
Read in the mv_MasterBeauty and mv_mv2DToxik EXR image sequences; the Read1 and Read2 nodes are inserted in the Node Graph panel.

Step –4
Click on an empty area of the Node Graph panel to deselect the selected nodes, if any.

Step –5
Choose the Channel button from the Nodes toolbar; the Channel menu is displayed. Next, choose ShuffleCopy from the menu; the ShuffleCopy1 node is inserted in the Node Graph panel.

Step –6
Press and hold the left mouse button on the 1 input of the ShuffleCopy1 node and then drag the cursor to the Read2 node in the Node Graph panel; a connection is established between the ShuffleCopy1 and Read2 nodes.

Step –7
Press and hold the left mouse button on the 2 input and then drag the cursor to the Read1 node; a connection is established between the ShuffleCopy1 and Read1 nodes, refer to Figure 2. Next, select the ShuffleCopy1 node and then press 1 to view the output of the ShuffleCopy1 node in the Viewer1 panel.
The ShuffleCopy1 node connected to the Read1 and Read2 nodes
Figure 2  The ShuffleCopy1 node connected to the Read1 and Read2 nodes
Step –8
In the ShuffleCopy tab of the ShuffleCopy1 node properties panel, select MV2E_mv2DToxik_persp from the 1 in drop-down.

Step –9
Select other layers > motion from the out2 drop-down, refer to Figure 3.
The ShuffleCopy1 node properties panel
Figure 3   The ShuffleCopy1 node properties panel
Step –10
In the ShuffleCopy tab of the ShuffleCopy1 node properties panel, select the check boxes, as shown in Figure 3.

Step –11
Select the ShuffleCopy1 node in the Node Graph panel and then choose the Filter button from the Nodes toolbar; the Filter menu is displayed. Next, choose VectorBlur from the menu; the VectorBlur1 node is inserted between the ShuffleCopy1 and Viewer1 nodes.

Step –12
In the VectorBlur tab of the VectorBlur1 node properties panel, select motion from the uv channels drop-down.

Step –13
Enter 0.5 in the multiply field.

Step –14
Scrub in the timeline to preview the motion blur effect.

Step –15
Choose File > Save from the menu bar to save the script.

Wednesday, April 24, 2013

Pull a key using the IBKColor and IBKGizmo nodes

Tutorial 3 of Chapter 11 (Keying) from The Foundry NukeX 7 for Compositors textbook:

In this tutorial, you will pull a key using the IBKColor and IBKGizmo nodes. Figures 1 displays the input green screen image and final composite, respectively.

Tutorial 3 of Chapter 11 Nuke Book
Figure 1 - The input (left) and final (right) images displayed
Step – 1
Navigate to http://www.hollywoodcamerawork.us/greenscreenplates.html and download Hair Detail clip. Next, extract content of zip file to your hard drive.

Step – 2
Start a new script in Nuke. Read in the Hair Detail clip you have downloaded; the Read1 node is inserted in the Node Graph panel. Next, press 1 to display the output of the Read1 node in the Viewer1 panel.

Step – 3
Select the Read1 node in the Node Graph panel and then choose the Keyer button from the Nodes toolbar; the Keyer menu is displayed. Next, choose IBKColour from the menu; the IBKColourV3_1 node is inserted in the Node Graph panel. Notice that the output is black in the Viewer1 panel. Next, you will rectify it.

Step – 4
In the Parameters tab of the IBKColourV3_1 node properties panel, select green from the screen type drop-down; the output of the IBKColourV3_1 is displayed in Viewer1 panel, as shown in Figure 2.
The output of the IBKColourV3_1 node
Figure 2  The output of the IBKColourV3_1 node
Step – 5
Enter -0.037 in the g field corresponding to the darks parameter.

Step – 6
Enter 0.16 in the g field corresponding to the lights parameter; the output is displayed in the Viewer1 panel, as shown in Figure 3.

The output after setting values of the darks and lights parameters
Figure 3  The output after setting values of the darks and lights parameters
Step – 7
Enter 0.86 in the erode field.

Step – 8
Enter 7 in the patch black field; a clean plate is created, as shown in Figure 4.

The clean plate displayed
Figure 4  The clean plate displayed

The r, g, and b fields corresponding to the darks and lights parameters are used to separate the black color and the screen color (green in this case). The erode field is used to correct the foreground edges. You can use the patch black field to remove the black color from the output image but before using this field make sure that you have separated the black color and the screen color using the darks and lights parameters.

Step – 9
Click on the empty area of the Node Graph panel and then choose the Keyer button from the Nodes toolbar; the Keyer menu is displayed. Next, choose IBKGizmo from the menu; the IBKGizmoV3_1 node is inserted in the Node Graph panel.

Step – 10
Press and hold the left mouse button on the fg input of the IBKGizmoV3_1 node and then drag the cursor to the Read1 node; a connection is established between the IBKGizmoV3_1 and Read1 nodes.

Notice that the IBKGizmoV3_1 node has three input connectors, namely bg, c, and fg. The input bg is used to connect a background image. This image is used to calculate the edge details. The input c is used to connect an IBKColor node. You can also connect a clean plate to it. The clean plate produces finer results than the IBKColor node.

Step – 11
Press and hold the left mouse button on the input c of the IBKGizmoV3_1 node and then drag the cursor to the IBKColorV3_1 node; a connection is established between the IBKColorV3_1 and IBKGizmoV3_1 nodes.

Step –12
Make sure IBKGizmoV3_1 is selected in the Node Graph panel and then press 1; the output of the IBKGizmoV3_1 node is displayed in the Viewer1 panel.

Step – 13
In the IBK tab of the IBKGizmoV3_1 node properties panel, select C-green from the screen type drop-down.

The options in the screen type drop-down are used to select the screen type. Select C-blue option from it if the foreground image is a blue screen image. For green foreground image, select C-green option from this drop-down. If you select the pick option from this drop-down, you can replace the input c with a single color. In this case, the BKGizmoV3_# node will behave like a traditional keyer.

Step – 14
Hover the cursor over the Viewer1 panel and then press A; the alpha channel is displayed in the Viewer1 panel, as shown in Figure 5. Now, press A again to switch to the color channels.
The alpha channel displayed
Figure 5  The alpha channel displayed
Step –15
Click on the empty area of the Node Graph panel to deselect the selected nodes, if any. Next, choose the Draw button from the Nodes toolbar; the Draw menu is displayed. Now, choose Grid from the menu; the Grid1 node is inserted in the Node Graph panel.

Step –16
Select the IBKGizmoV3_1 node in the Node Graph panel and then press M; the input A of the Merge1 node is connected with the IBKGizmoV3_1 node.

Step – 17
Press and hold the left mouse button on the input B of the Merge1 node and drag the cursor to the Grid1 node; a connection is established between the Merge1 and Grid1 nodes. The output of the Merge1 node is displayed in the Viewer1 panel. In the Grid tab of the Grid1 node properties panel, enter 64 in the size field; the grid pattern behind the character is changed.

Step –18
Choose File > Save from the menu bar to save the script.

Friday, April 19, 2013

Nuke book ready

"The Foundry NukeX 7 for Compositors" Book

Nuke Book from CADCIM TechnologiesNuke is an Academy Award® winning compositing software application widely used in film and broadcast industries. It is a production-proven visual effects tool used to composite images, multiple stills, 3D renders, and image sequences into stunning digital art. The advanced tools available in NukeX allows artists to work easily and efficiently on complex compositing tasks. Features such as the 32-bit linear color workflow,  multi-channel support, optical flow algorithms, 3D camera tracking, and stereoscopic processing make Nuke the most sought after composting package in the world. All leading VFX studios around the world use Nuke as their main composting application. Nuke is also highly customizable through Python scripting and C-APIs. It also features a comprehensive 3D workspace that allows you to do tasks such as projection mapping, particle simulation, camera tracking, and so on with ease. This nuke book aims at harnessing the power of Nuke for roto artists, compositors, and visual effects artists.Keeping in view the varied requirements of the users, the Nuke book first introduces the basic features of Nuke and then gradually progresses to cover the advanced composting techniques. This Nuke book will help the learners transform their imagination into reality with ease. Also, it takes the users across a wide spectrum of composting through progressive examples and numerous illustrations. 

Table of Contents
Chapter 1: Exploring NukeX 7 Interface
Chapter 2: Exploring Viewer Nodes
Chapter 3: Building Node Network
Chapter 4: Exploring Channels
Chapter 5: Working with Draw Nodes
Chapter 6: Working with Color
Chapter 7: Compositing Render Passes
Chapter 8: 2D Tracking
Chapter 9: Planar Tracking
Chapter 10: Transformations, Temporal Operations, and Filters
Chapter 11: Keying
Chapter 12: 3D Compositing
Project: Integrating CINEMA 4D and NukeX
Index

Salient Features of the Nuke Book
  • Consists of 12 chapters and 1 project that are organized in a pedagogical sequence covering various aspects of composting. 
  • The author has followed the tutorial approach to explain various concepts of composting. 
  • The first page of every chapter summarizes the topics that are covered in it. 
  • Consists of hundreds of illustrations and a comprehensive coverage of The Foundry NukeX 7 concepts and techniques
  • Step-by-step instructions that guide the users through the learning process.
  • Additional information is provided throughout the book in the form of notes and tips.
  • Self-Evaluation test and Review Questions are given at the end of each chapter so that the users can assess their knowledge.
  • Technical support by contacting techsupport@cadcim.com.

Nuke Book : Pre-Order Now

Dual Inputs of the Merge Node

The Merge node has two inputs: A and B, refer to Figure 1. The input A is used to connect the foreground element whereas the input B is used to connect the background element. The data is always copied from the input A to the input B. If you disconnect the node associated with the input A, the data stream will keep flowing through the input B.

The Merge1 node with two input connectors
Figure 1 The Merge1 node with two input connectors

Thursday, April 18, 2013

Using the Dot Node

The Dot node is used to create bends in the arrows connecting node. This node helps in organizing the node network in the Node Graph panel. To create a bend in the connecting arrows, select the node after which you need the Dot node to appear and then choose Dot from the Other menu; a Dot# node will be inserted in the Node Graph panel, refer to Figure 1. Next, drag the Dot node as per your requirement.

Figure 1 The connecting pipe between the Grade1 and Write1 nodes bent using the Dot node
Tip:
1. You can use the . (period) key to add a Dot node.
2. You can also add a Dot node to an existing connection by using the CTRL key. To do so, press and hold the CTRL key; a yellow diamond shape will appear on the connecting arrow. Next, click on the shape to insert a Dot node on the connecting arrow.

Editing Nodes

Standard shortcut keys (CTRL+C, CTRL+V, and CTRL+X) are used to perform editing operations on the nodes. To copy a node in the memory, select the node and then choose Edit > Copy from the menu bar. Next, click on the empty area of the Node Graph panel to deselect any selected node and then choose Edit > Paste from the menu bar; an exact copy of the selected node is created in the Node Graph panel.

Note: 
When you paste nodes, NukeX automatically connects them to the node that is selected before the paste command. 


Exporting Nodes as a Script

In Nuke, you can export nodes to an independent script file. It allows you to share your process tree with other artists in your team. To copy nodes to a Nuke script, choose File > Export Nodes As Script from the menu bar; the Export Nodes As Script dialog box will be displayed. Next, navigate to the folder where you want to save the script and enter name of the script in the pathname field. Next, choose the Save button. NukeX will save the selected node as a script with the specified name. Start Notepad and open the saved script in it to view its content. Figure 1 shows the content of the ColorCorrect node script opened in Notepad application.
Figure 1 The ColorCorrect Node script displayed in Notepad