Tutorial 2 of Chapter 10 (Transformations, Temporal Operations, and Filters) from The Foundry NukeX 7 for Compositors textbook:
In this tutorial, you will create an alpha channel from rose.jpg using the Shuffle node. Next, the alpha channel created using the Shuffle node will be used to mask the color adjustments made by using the HueShift node. Also, you will use the HueRotation parameter of the HueShift node to animate rose color. Figure 1 shows the input image and the output.
Step –1
Navigate http://www.mediafire.com/?51x6sa7cjscyb47 and then download nt003.zip to your hard drive. Next, extract the content of the zip file to your hard drive.
Step –2
Start a new script and then load the rose.jpg file; the Read1 node is inserted in the Node Graph panel. Next, press 1 to view the output of the Read1 node in the Viewer1 panel, as shown in Figure 2.
Step –3
Make sure the Read1 node is selected in the Node Graph panel and then press G; the Grade1 node is inserted between the Read1 and Viewer1 nodes.
Step –4
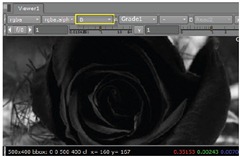
Hover the cursor over the Viewer1 panel and press B; the blue channel is displayed in the Viewer1 panel, as shown in Figure 3.
Step –5
In the properties panel of the Grade1 node, make sure the Grade tab is chosen and then set the values of the fields as follows:
blackpoint: 0.03 whitepoint: 0.0293 lift: -0.001
gain: 0.08 offset: -2 gamma: 1.3
Also, clear the red and green check boxes located on the right of the channels drop-down. After setting the values, the modified blue channel is displayed, as shown in Figure 4.
Next, you will blur the blue channel by using the Blur Node.
Step –6
Step –7
In the properties panel of the Blur1 node, make sure the Blur tab is chosen and then select rgb from the channels drop-down. Next, clear the red and green check boxes which appear on selecting rgb from the channels drop-down, refer to Figure 6.
Step –8
Enter 10.5 in the size input box; the blue channel is blurred by 10.5 units. Figure 7 shows the blurred blue channel.
Step –9
Make sure the Blur1 node is selected in the Node Graph panel. Next, choose the Channel button on the Nodes toolbar; the Channel menu is displayed. Next, choose Shuffle from this menu; the Shuffle1 node is inserted between the Blur1 and Viewer1 nodes.
Step –10
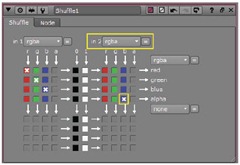
In the properties panel of the Shuffle1 node, make sure that the Shuffle tab is chosen. Next, select rgba from the in 2 drop-down and then select the blue check box in the 4th row of the in 2 channel matrix, refer to Figure 8; the alpha channel is shuffled with the blue channel.
Step –11
Hover the cursor over the Viewer1 panel and press A; the alpha channel is displayed. Again, press A; the RGB channels are displayed in the Viewer1 panel.
Next, you will add the HueShift node to change the hue of the rose and then mask the changes by using the alpha channel generated above.
Step –12
Select the Read1 node in the Node Graph panel. Next, press and hold SHIFT and then choose the Color button from the Nodes toolbar; the Color menu is displayed. Choose HueShift from the menu; the HueShift1 node is inserted in the Node Graph panel with a branched connection with the Read1 node, as shown in Figure 9. Next, release the SHIFT key.
Step –13
Make sure that the HueShift1 node is selected in the Node Graph panel and then press 1; the output of the HueShift1 node is displayed in the Viewer1 panel.
Step –14
Press and hold the left mouse button on the mask input of the HueShift1 node and then drag the cursor to the Shuffle1 node to establish a connection between the Shuffle1 node and the mask input of the HueShift1 node, refer to Figure 10.
Step –15
In the properties panel of the HueShift1 node, make sure that the HueShift tab is chosen and then set the hue rotation field value to -150. Figure 11 shows the output of the HueShift1 node.
Step –16
Select the Shuffle1 node in the Node Graph panel and choose the Color button from the Nodes toolbar; the Color menu is displayed. Next, choose Invert from the menu; the Invert1 node is inserted between the Shuffle1 and HueShift1 nodes in the Node Graph panel and the alpha channel is reversed. Figure 12 shows the output after inverting the mask.
Next, you will animate the HueRotation parameter of the HueShift1 node to create an animated color change effect.
Step –17
Make sure that the Current Time Marker is placed at frame 1. Next, in the properties panel of the HueShift1 node, make sure the HueShift1 tab is chosen and then choose the Animation button corresponding to the hue rotation parameter; a flyout is displayed, as shown in Figure 13. Next, choose the Set key option from this flyout; a keyframe is created at frame 1. Also, the base color of the HueRotation field turns blue which indicates that this parameter has been animated.
Step –18
Choose the Last frame button from the timeline controls and then enter 180 in the hue rotation field in the HueShift tab of the HueShift1 node properties panel; a keyframe is created at frame 100. Also, an animation node indicator (A) appears on the HueShift1 node tile in the Node Graph panel which indicates that one or more parameters of the node are animated, refer to Figure 14.
Step –19
Choose the Play forward button from the timeline controls to start the playback. You will notice in the Viewer1 panel, the color changes as the animation starts playing.
Next, you will render the script using the Write node.
Step –20
Make sure the HueShift1 node is selected in the Node Graph panel and then press W; the Write1 node is connected between the HueShift1 and Viewer1 nodes and its properties panel is displayed.
Step –21
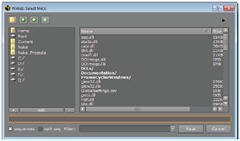
In the properties panel of the Write1 node, make sure that the Write tab is chosen and then click on the folder icon corresponding to the file parameter; the Write1: Select file(s) dialog box is displayed, as shown in Figure 15. In this dialog box, navigate to location where you need to save the file and then append c04_tut2.%03d_rndr.jpeg to the path displayed in the pathname field. Next, choose the Save button. Notice that the jpeg option is automatically selected in the file type drop-down of the Write1 node properties panel, refer to Figure 16.
The %03d in the file name c04_tut2.%03d_rndr.jpeg represents the frame padding structure in the file name. On rendering the script, NukeX will create a jpeg sequence starting from c04_tut2.001_rndr.jpeg to c04_tut2.100_rndr.jpeg as the global frame range is set from 1 to 100.
Step –22
Enter 1 in the quality field.
Next, you will set the frame range that you need to render.
Step –23
Choose the Render button; the Render dialog box will be displayed. In this dialog box, select global from the Frame range drop-down and then choose the OK button; the Progress window is displayed. This window will close automatically on completion of the rendering process.
If you need to render a single frame only, enter the frame number in the field next to the Frame range drop-down. On choosing the Play forward button from the timeline controls, the Write1 node will use the rendered jpeg sequence for displaying the output in the Viewer1 panel instead of its input.
Step –24
Choose File > Save from the menu bar to save the script. Figure 17 displays the network of nodes used in the script.
In this tutorial, you will create an alpha channel from rose.jpg using the Shuffle node. Next, the alpha channel created using the Shuffle node will be used to mask the color adjustments made by using the HueShift node. Also, you will use the HueRotation parameter of the HueShift node to animate rose color. Figure 1 shows the input image and the output.
 |
| Figure 1 The input image and output |
Navigate http://www.mediafire.com/?51x6sa7cjscyb47 and then download nt003.zip to your hard drive. Next, extract the content of the zip file to your hard drive.
Step –2
Start a new script and then load the rose.jpg file; the Read1 node is inserted in the Node Graph panel. Next, press 1 to view the output of the Read1 node in the Viewer1 panel, as shown in Figure 2.
 |
| Figure 2 The output of the Read1 node |
Make sure the Read1 node is selected in the Node Graph panel and then press G; the Grade1 node is inserted between the Read1 and Viewer1 nodes.
Step –4
Hover the cursor over the Viewer1 panel and press B; the blue channel is displayed in the Viewer1 panel, as shown in Figure 3.
 |
| Figure 3 The blue channel displayed |
Next, you will modify the blue channel of the rose.jpg by using the parameters of the Grade1 node to create the alpha.
Step –5
In the properties panel of the Grade1 node, make sure the Grade tab is chosen and then set the values of the fields as follows:
blackpoint: 0.03 whitepoint: 0.0293 lift: -0.001
gain: 0.08 offset: -2 gamma: 1.3
Also, clear the red and green check boxes located on the right of the channels drop-down. After setting the values, the modified blue channel is displayed, as shown in Figure 4.
 |
| Figure 4 The modified blue channel |
The Grade node is used to color-correct the overexposed images. The blackpoint parameter sets the black point (darkest pixel), whereas the whitepoint parameter sets the white point (lightest pixel) in the image. The color specified by the lift parameter defines the color into which the black pixels will change. The gain parameter is used to set the color of the white pixels. The multiply parameter is used to lighten the image while preserving the blackpoint. The values specified for this field are multiplied with the output of the Grade node. The offset parameter is used to add fixed offset value to the output of the Grade node. The gamma parameter is used to lighten or darken the midtones. It applies constant gamma to the result of the Grade node.
Step –6
Make sure the Grade1 node is selected in the Node Graph panel and then press B; the Blur1 node is inserted between the Grade1 and Viewer1 nodes in the Node Graph panel, as shown in Figure 5.
 |
| Figure 5 The Blur1 node inserted in the Node Graph panel |
In the properties panel of the Blur1 node, make sure the Blur tab is chosen and then select rgb from the channels drop-down. Next, clear the red and green check boxes which appear on selecting rgb from the channels drop-down, refer to Figure 6.
 |
| Figure 6 The Blur1 node properties panel |
Enter 10.5 in the size input box; the blue channel is blurred by 10.5 units. Figure 7 shows the blurred blue channel.
 |
| Figure 7 The blurred blue channel |
Make sure the Blur1 node is selected in the Node Graph panel. Next, choose the Channel button on the Nodes toolbar; the Channel menu is displayed. Next, choose Shuffle from this menu; the Shuffle1 node is inserted between the Blur1 and Viewer1 nodes.
Step –10
In the properties panel of the Shuffle1 node, make sure that the Shuffle tab is chosen. Next, select rgba from the in 2 drop-down and then select the blue check box in the 4th row of the in 2 channel matrix, refer to Figure 8; the alpha channel is shuffled with the blue channel.
 |
| Figure 8 The blue check box selected in the 4th row of the in 2 channel matrix |
Hover the cursor over the Viewer1 panel and press A; the alpha channel is displayed. Again, press A; the RGB channels are displayed in the Viewer1 panel.
Next, you will add the HueShift node to change the hue of the rose and then mask the changes by using the alpha channel generated above.
Step –12
Select the Read1 node in the Node Graph panel. Next, press and hold SHIFT and then choose the Color button from the Nodes toolbar; the Color menu is displayed. Choose HueShift from the menu; the HueShift1 node is inserted in the Node Graph panel with a branched connection with the Read1 node, as shown in Figure 9. Next, release the SHIFT key.
 |
| Figure 9 The HueShift1 node in the Node Graph panel |
Make sure that the HueShift1 node is selected in the Node Graph panel and then press 1; the output of the HueShift1 node is displayed in the Viewer1 panel.
Step –14
Press and hold the left mouse button on the mask input of the HueShift1 node and then drag the cursor to the Shuffle1 node to establish a connection between the Shuffle1 node and the mask input of the HueShift1 node, refer to Figure 10.
 |
| Figure 10 The mask input dragged to the Shuffle1 node |
In the properties panel of the HueShift1 node, make sure that the HueShift tab is chosen and then set the hue rotation field value to -150. Figure 11 shows the output of the HueShift1 node.
 |
| Figure 11 The output of the HueShift1 node |
The alpha channel which is generated using the Shuffle1 node is used to mask the output of the HueShift1 node. The HueShift node transforms the colorspace of the input image. The hue rotation field is used to rotate the colorspace around the Y axis. You can use different values for the hue rotation field to get the desired result.
Step –16
Select the Shuffle1 node in the Node Graph panel and choose the Color button from the Nodes toolbar; the Color menu is displayed. Next, choose Invert from the menu; the Invert1 node is inserted between the Shuffle1 and HueShift1 nodes in the Node Graph panel and the alpha channel is reversed. Figure 12 shows the output after inverting the mask.
 |
| Figure 12 The output after inverting the mask |
Step –17
Make sure that the Current Time Marker is placed at frame 1. Next, in the properties panel of the HueShift1 node, make sure the HueShift1 tab is chosen and then choose the Animation button corresponding to the hue rotation parameter; a flyout is displayed, as shown in Figure 13. Next, choose the Set key option from this flyout; a keyframe is created at frame 1. Also, the base color of the HueRotation field turns blue which indicates that this parameter has been animated.
 |
| Figure 13 A flyout displayed on choosing the Animation menu button |
Choose the Last frame button from the timeline controls and then enter 180 in the hue rotation field in the HueShift tab of the HueShift1 node properties panel; a keyframe is created at frame 100. Also, an animation node indicator (A) appears on the HueShift1 node tile in the Node Graph panel which indicates that one or more parameters of the node are animated, refer to Figure 14.
 |
| Figure 14 The animation node indicator displayed on the HueShift1 node |
Choose the Play forward button from the timeline controls to start the playback. You will notice in the Viewer1 panel, the color changes as the animation starts playing.
Next, you will render the script using the Write node.
Step –20
Make sure the HueShift1 node is selected in the Node Graph panel and then press W; the Write1 node is connected between the HueShift1 and Viewer1 nodes and its properties panel is displayed.
Step –21
In the properties panel of the Write1 node, make sure that the Write tab is chosen and then click on the folder icon corresponding to the file parameter; the Write1: Select file(s) dialog box is displayed, as shown in Figure 15. In this dialog box, navigate to location where you need to save the file and then append c04_tut2.%03d_rndr.jpeg to the path displayed in the pathname field. Next, choose the Save button. Notice that the jpeg option is automatically selected in the file type drop-down of the Write1 node properties panel, refer to Figure 16.
 |
| Figure 16 The Write1:Select file(s) dialog box |
 |
| Figure 17 The Write1 node properties panel |
Tip:If you are rendering a single file such as a QuickTime (MOV) movie, no frame padding is required. You can just provide the name of the movie.
Step –22
Enter 1 in the quality field.
Next, you will set the frame range that you need to render.
Step –23
Choose the Render button; the Render dialog box will be displayed. In this dialog box, select global from the Frame range drop-down and then choose the OK button; the Progress window is displayed. This window will close automatically on completion of the rendering process.
If you need to render a single frame only, enter the frame number in the field next to the Frame range drop-down. On choosing the Play forward button from the timeline controls, the Write1 node will use the rendered jpeg sequence for displaying the output in the Viewer1 panel instead of its input.
Step –24
Choose File > Save from the menu bar to save the script. Figure 17 displays the network of nodes used in the script.
 |
| Figure 17 Network of nodes used in the script in the Node Graph panel |
No comments:
Post a Comment